Disclaimer: Any views expressed by individuals and organisations are their own and do not in any way represent the views of The Heritage Portal. If you find any mistakes or historical inaccuracies, please contact the editor.
On an earlier version of The Heritage Portal the following question was posted: "I need to repair the wooden flooring in my historic home. Any recommendations?" Adrian de Villiers, Chief Architect at the Department of Public Works replied with the following priceless advice.
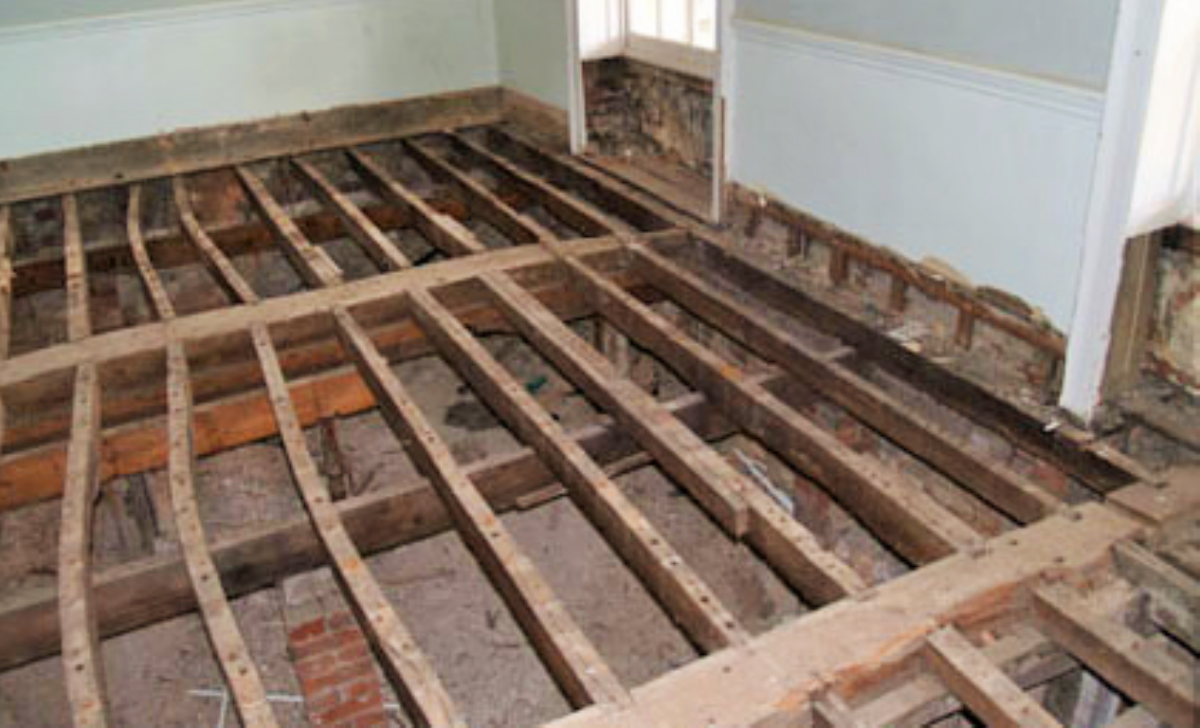
When one's talking 'old wooden floors', there are two types of wooden floors. There is the parquet block floor which is laid in hot tar onto a solid substrate like a cement screed. Then there is the suspended wooden floor at Aunty Julie's house, which is found in earlier buildings than those with 'parquet'.
Suspended floors have a void below them which is naturally ventilated. The tongue and groove planks are supported by a system of beams called 'sleepers' and joists that rest on the sleepers. The planks are often nailed to the joists with blind-nailing (meaning the nails are hidden) or just as often, they are nailed from the top vertically into the joist below (meaning you can see the nail head flush with the floor surface).
I imagine the floor you're referring to is a suspended floor (with most likely, tongue and groove boarding). When it comes to fixing a floor like this, a lot depends on the type of repairs that are needed. For instance... Do you just want to refinish the floor?... or are there structural problems which require replacement of boards or joists? A floor in a bad condition can be repaired only to have the same problems cropping up a few months later. That is... if some fundamentally important points have not been sorted out...
Note: A floor should be well ventilated underneath; check to ensure all airbricks are open (these are the little waffle-like grids visible in the brickwork, below the floor line, on the outside of your house. Air should be able to flow through underneath your house, allowing the floor system to breath and thus preventing build up of excess moisture.
Water and moisture should be kept away from the house. Leaking pipes or rain water pooling around the building can result in build up of excess moiture. Aunty Julie, phone the plumber.
Unventilated and damp floors cause timbers to rot or invite the most evil of our friends, White ant! White ant can burrow several meters down into the ground below your foundations, working while you are sleeping, creating large kingdom cavities and eating away wood. The other thing is that they eat from the inside out, so once you've noticed it, a lot of damage has already been done
So ventilate and keep your floor void dry; Keep White ant at bay!
Now a note on floor finish... Older suspended wooden flooring often used wide Oregon pine floorboards. They normally have one of two existing finishes; either a varnish or a wax polish, or also frequently, a varnish with a wax polish over it. These days with modern varnishes, pople don't use wax so much; it's less fuss.
For removing varnish use paint stripper and for removing wax, use a wax remover; both products available from your hardware shop. Since the process in removing varnish or wax is similar, I will describe the process, using the work 'wax'.
Sometimes wooden floors have excessive wax build up from years of polish applied over older layers of polish. Sometimes this polish deposit is dark brown. This is not just in-grained dirt; some people used furniture and floor polishes that contained a brown-coloured wax. Most polishing was done with clear wax polish though.
Stripping the polish wax from the floor:
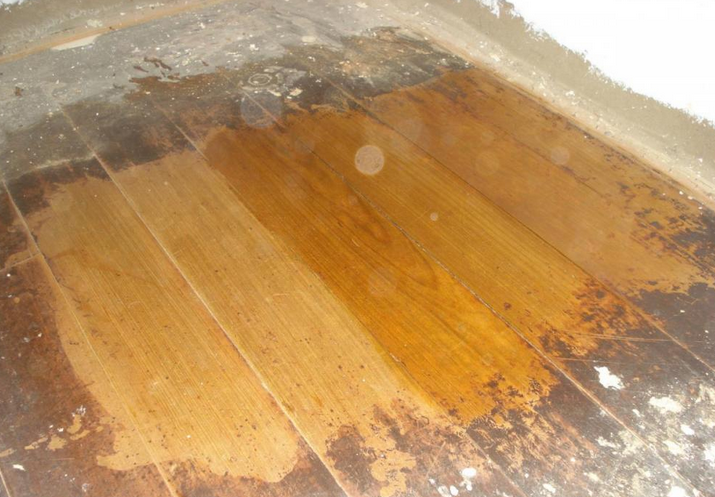
Aunty Julie's household approach: All polish can be removed using a proprietary chemical wax stripper and follow the manufacturer's instructions. It may be found following the removal of wax that the floor surface only requires a light hand sand before a proprietary floor varnish can be applied (Refer to the pic at the bottom). I'd go with varnish; it's less maintenance than wax. The objective of working on the floor should not be to achieve a perfectly smooth and flat floor. Sanding the floor using a rotary floor sander (often used to achieve a perfectly flat surface) should be avoided at all costs. It's a sin. Aunty Julie hates sin. These types of sanders are so aggressive, they remove 'years' of life from a floor in a matter of minutes. If the floor appears slightly undulated, but has no dangerous steps on which somebody could trip, it may be considered acceptable. A floor with this appearance also achieves the desirable character associated with an old but safe building and carries a patina.
Conservation approach: In a museum house, a floor of character would only be given a cleaning and regular polishing with wax. Only if thoroughly gunked up with years of wax would removal of all old wax and a re-waxing be considered by the conservator. This may be sensible if one can, for instance, no longer even see the wood. Aunty Julie loves wood. Should Aunty Julie's neighbour Mrs Nettlestew, insist on a perfectly flat and blemish-free surface, her floor may require a more intensive treatment and there are risks involved: Sanding the floor with an industrial rotary sanding machine where the object is to remove every blemish, may result in the machine removing sufficient thickness of the floor board to reveal the tongue and groove joints along the floor boards. This will compromise the structural integrity of the boarding and there is no remedy for this, apart from total replacement of the floor boards. So ultimately: Either you accept the older character with its patina or you go smooth-smooth and possibly lose the whole floor. Aunty Julie's got wrinkles and everbody still likes 'her'!... so your floor's got wrinkles. Cope with it. And love it.
Appropriate hand sanding methods are rather to be employed.
General process: Remove floor wax, remove varnish, lightly hand-sand to smooth surface, re-varnish.
Make use of a good quality approved chemical wax removing agent and follow manufacturer’s instructions. Obedience is better than sacrifice. Remove wax or varnish with a scraper. Sometimes floorboards have dried out and assumed a concave shape on their width. If so make sure your scraper is slightly convex in shape owing to the distorted concave floor boards. Hard black, green or brown abrasive pads available from a hardware shop can be used to continue the removal of wax once the majority has been removed by the scraper. You can normally work the surface down to a very smooth finish without even the need of sandpaper, but see how it goes.
Should there be an existing layer of varnish, strip the finish with varnish remover using scrapers and abrasive pads and clean off with a damp cloth. Follow with a gentle sanding procedure, always sanding with the grain of the wood in as long-as-possible even strokes. Care should be taken not to sand deeper than the original surface of the wood itself. As with the scraper, the sanding block should be slightly convex to fit the concave form of the old floor board (if concave). The general surface following a sanding, should feel silky smooth with the patina still visible. The patina shows itself in grooves or marks which are too deep to remove with sanding, and they remain a testament to the floors age. The silky smooth finish is accomplished by sanding with varying grades of sandpaper from 'rougher' to 'finer' ending in a final rubbing down with steel wool and a wipe off with Turps.
Pic via Adrian Devilliers
Once sanded and smooth, the floor can be varnished using a good quality approved clear floor varnish. Enjoy. Only wax was removed from this floor (no sanding); the richer coloured right hand portion has been oiled as a test to show how the floor would appear if varnished.
Comments will load below. If for any reason none appear click here for some troubleshooting tips. If you would like to post a comment and need instructions click here.

